This BlogSpot, I'll publish some IT related software, news or experience. Any comments or suggestions are accepted. Feel free to look around! ^^

Showing posts with label How To.... Show all posts

27 November, 2008

Hide important files inside an image

I posted about Make the folder invisible to hide "important" files before, and now here's another method on how to hide important/confidential things in an image. The result image will be exactly the same as a normal image (except the file size may vary depending on your hidden files). The image can be used solely for hiding confidential data, or it could be used to send confidential data over the net too.

For this, you need an archiver, like 7-zip, and a picture. A jpg would be good enough.

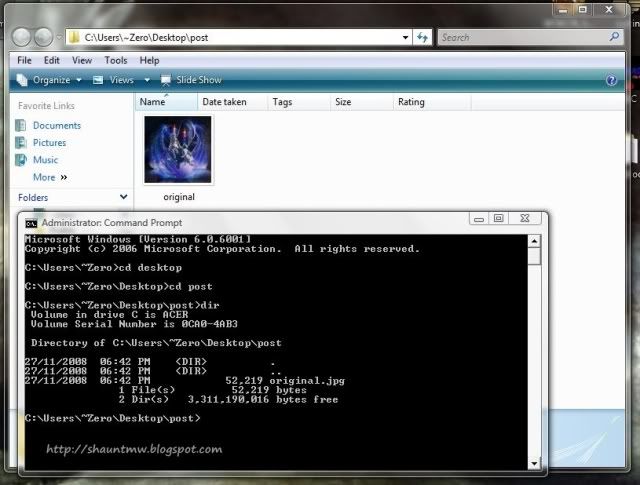
First, use command prompt to access to your picture folder. To open command prompt, go to run and run cmd. Windows vista can just search for command promt in the startbar. Use the cd command to change directory. For example below, my picture is place on my desktop, in a folder name "post".

click to enlarge

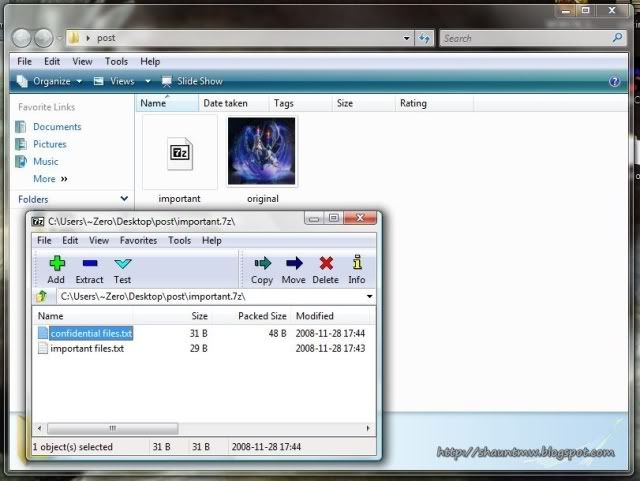
Now, archive your files using your archiver. For this post, I will demonstrate this using the 7-zip archiver. Put the archive in the same directory as your image file.

click to enlarge

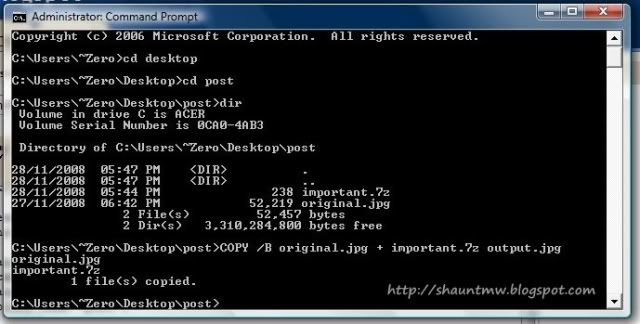
In the command prompt, type in COPY /B image.jpg + file.7z output.jpg as shown below.

click to enlarge

A new image file should have appeared in the same directory as your important files and the original image. Notice that there are no difference between the original image and the new image that contains the "secret" (except for the file size maybe). You may now delete the original image and the "secret" archive and empty your recycle bin to destroy any evidence.

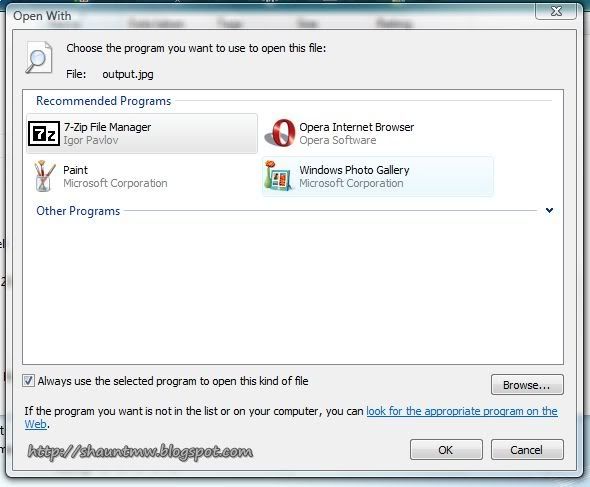
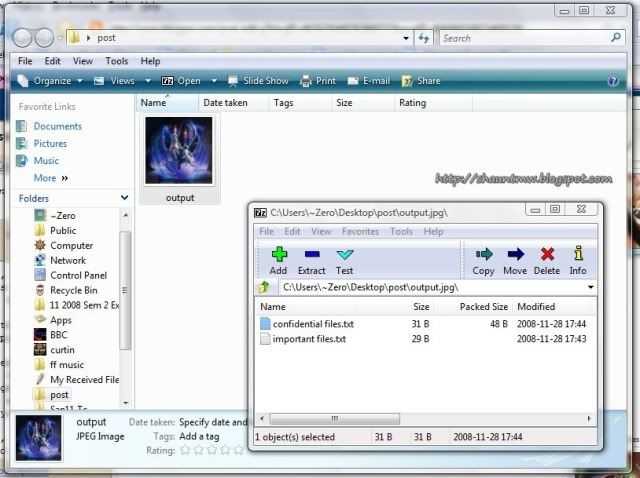
Now, to extract the "secret" out, just open the image file with the archiver you used to archive it.

click to enlarge

click to enlarge

Tuck this image into your image folder to confuse sneaky hackers or your naughty son to prevent it from accessed or accidentally deleted.

That's it~
Happy hiding. hehe~~~

10 July, 2008

Hide your important folder (Part 2)

This post shows you how to make the folder invisible to hide files, while still get easy access to it. And now I have a part 2, which also hides folder while still get easy access to it, by using an App Launcher like Humanized Enso.


The App Launcher Humanized Enso has an interesting feature of "learning" new commands, and this is how we make use of it.

Step 1: Create a new folder
Step 2: Learn the new command
Step 3: Hide the folder


Step 1: Create a new folder
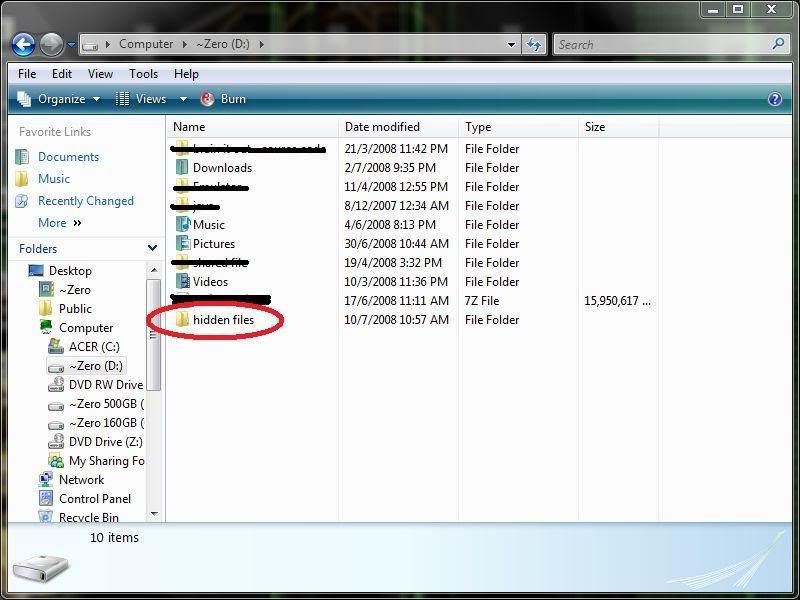
Just create a new folder and rename it as whatever you like. For example below, I name my new folder as "hidden files".

click to enlarge


Step 2: Learn the new command
Highlight the folder, open up Humanized Enso (by default is holding the CapsLock key), and learn as a new command, for example below I learn it as Open windows files. You would want the new command be hard to guess but easy to remember.

click to enlarge


Step 3: Hide the folder
Right click on the folder, choose properties. Under attribute, tick for hidden. Click on OK, done. The folder is now hidden, and yet you can simply access to the hidden folder by using the enso command you assigned just now.


More information on Make the folder invisible to hide "important" files.
More information on Humanized Enso

30 June, 2008

How to remove the "invisible" folder mentioned from previous post?

Ok, I've receive quite an amount of messages regarding on the deletion of the invisible folder I mentioned from previous post. Well, as some may know (and experienced), after you create the "invisible folder", you can't move/rename/delete it using the normal way. Well, this could be an advantage on protecting your files, but it could be a problem too, I know.

So, now I'll explain in detail, on how to move/rename/delete the invisible folder. If you know how to do these steps, just click on the next step to skip on below.
Step 1: Open command promt
Step 2: Change directory
Step 3: Rename (important!!!)


Step 1: Open command promt
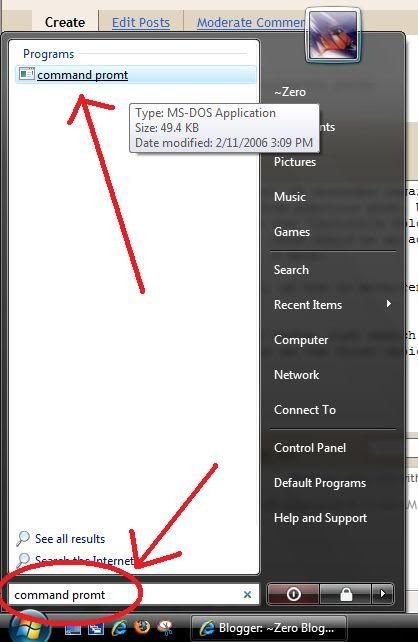
First, open command promt. For Windows Vista, just search for 'command promt' in the startbar and it should come out as the first choice. For Windows XP, go Start -> Run, and type in "cmd" and click ok, the command promt will come out.

Windows Vista:
click to enlarge

Windows XP
click to enlarge


Command promt in both Vista and XP will look the same, so just continue.

Step 2: Change directory
The command for change directory is "cd". So just cd to the directory you put your folder in, for example: in vista, if your invisible folder in on the desktop, just type in "cd desktop" and enter, the line will change from "C:\Users\yourname>" into "C:\Users\yourname\Desktop>". See screenshots below.

Before:
click to enlarge

After:
click to enlarge

You can check whether you're in the right directory or not by using the "dir" command.

Step 3: Rename
This step is very important. It may looks confusing, but actually it is very simple.

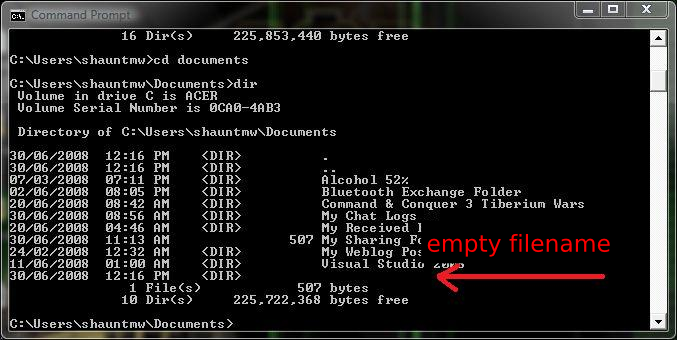
Make sure you're in the right directory. Again, you can check all your files and folders in the directory you currently in by using the "dir" command. If you're in the right directory, an empty name folder should be on the list of the "dir".

click to enlarge

When you're in the right directory, just type in "ren " " asd" and enter. THE SPACE BETWEEN THE QUOTES ARE THE ALT+0160, NOT A NORMAL SPACE.

Once this is done, you should see the invisible folder now have a filename "asd". You can move/rename/delete the normal way using windows explorer, and no longer need the command promt anymore, just close it.

If you wanna revert it back to invisible, just follow the same step on how you made it invisible in the first place. If you can't remember (or just want to make sure), you can refer back to my previous post: Make the folder invisible to hide "important" files

01 June, 2008

Make the folder invisible to hide "important" files

Everyone have some files that they would rather keep private (especially guys). One good approach is to bury them deep within those system files, but this makes access to the file rather complicated and inconvenient. Now I'll introduce one method that could make your folder invisible (but not hidden), that the files are invisible but still accessible in one or two clicks away.

This method will make your folder invisible. it will be visible only when it is highlighted, so to prevent anyone from accessing the folder by chance, try to tuck the folder to the corner or in a folder people less access. See below:


Ok, to do this, just follow the steps below:
1) Create a new folder

2) Rename it. Highlight the new folder and press F2 button, hold down Alt and type in 0160 using the numpad, then release. You won't see the numbers, you will see a blank space after you release the Alt button.

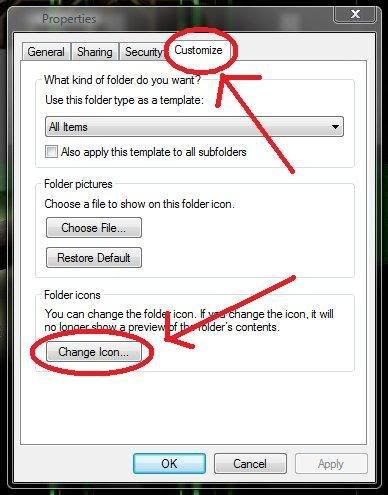
3) Change the icon. Right click the folder, properties, customize, change icon, select a blank icon and click ok.

click to enlarge


So that's it. You can throw your "private" thing inside, and you can simply access to them by double clicking the folder. I'm sure you know the location of the invisible folder, don't you?

Click here for a tutorial on How to remove this invisible folder?

07 February, 2008

How to split one big file into smaller files?

The main reason for people to split one big file into smaller files are to share files over the internet.

Most free mailboxes like Windows Live Hotmail and YahooMail, they got a limit size for attachment files. What if you got a huge file and you wanna e-mail it? You got to make it smaller than the maximum allowed size.

To share a file larger than the maximum size allowed by the mailbox provider, you can upload the file to a file host like rapidshare, and e-mail the download link to your contact. What if the file is so big, like Gigabytes of 'em? It could take forever to upload and download it.

So, an easier way, is to split the file into smaller parts of it. Ten 100MB files are easier to upload/download than a 1GB file. And don't expect a file host would host your 4GB dvd-image as a single file(unless you're using a paid host).

So, how do you split it?
By using file splitter of course!

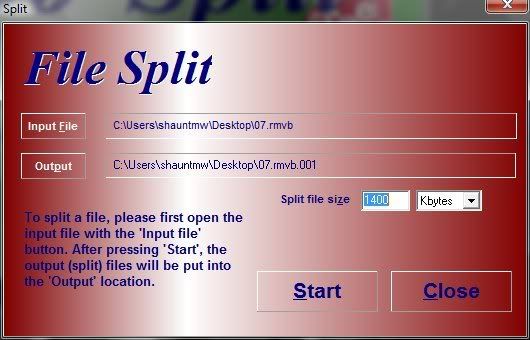
click to enlarge


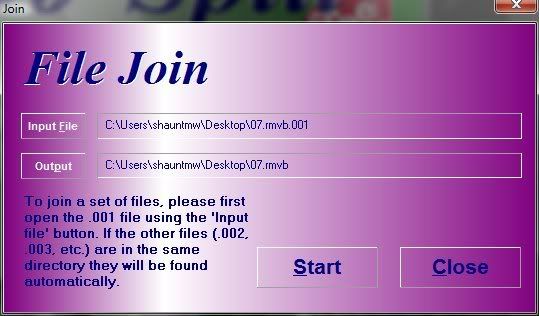
click to enlarge


click to enlarge


HJSplit is a freeware, multi-platform file splitter.
No installation is required, you just have to run the executable file inside the download. The whole program is as small as 300KB only. After you split the file, the smaller parts will have a file extension of file.001 file.002 file.003 and so on.

When joining up, you will need HJSplit too. The best way for sharing huge file, is to split them up into small files, and send out these small fragments, while you can also include the HJSplit client inside your files to your recipent. These files can also be joined using a 7-Zip archiever or WinRAR(may not work all the time).

You can download the HJSplit from the developers' site

External Links:
HJSplit from CNET Download.com
HJSplit from PC World
HJSplit from Softpedia
Search for HJSplit from Google

04 February, 2008

How to access blocked website?

Ever wanna chat with your friend at school, but they've blocked all messenging website? Ever wanna check your personal mailbox or update your personal blog from the office, but they've block all access to the mailbox providers like hotmail and yahoo? I'll tell you some of the ways you can try.

1) If you know the website server's IP address, you can type in the IP adress instead of the website address in the browser's address bar. Some network hosts only filter out keywords from the website address, but not the actual website itself.

2) Use a url redirection. The same reason as above, the hosts may only filter out keywords. Some free redirection: tinyurl, snipurl

3) Use a free subdomain redirection. This works like a redirection, but instead changes the website's domain. These subdomain hosts usually places an ad bar above the website you're viewing, but at least it does the job for you.

4) Use Google search for the website you want, and visit the cached copy of the website. This may preview an outdated version of the website to you, but if you just wanna use the service like instant messenging and mailbox, this shouldn't be bothering you.

5) Use a proxy server. One example of anoymizer is www.anoymizer.com. Some of the time, your network host did not block the proxy site, then you will be glad. But most schools will block proxy servers too.

6) Use Google Translate as a proxy. Go Google Translate and translate the website you wanna visit. The most unaffected results by the translation for English websites should be Chinese To English.

03 February, 2008

How to record sounds played from your computer?

Method ONE:
Close the door, turn off the fan, and make sure no sounds other sound is nearby. On the speaker to maximum volume, put a microphone near the speaker, and start recording...

Results: BAD!!

Method TWO:
Get a recording device that comes with an input port. Buy a cable, and connects the computer output to the device's input. Start recording...

Results: WORSE!!

WHY SO MUCH EFFORD?
Here's a better way. No external device required. Records exactly the same quality as how the audio is played by the computer.

Method THREE: (The right one)
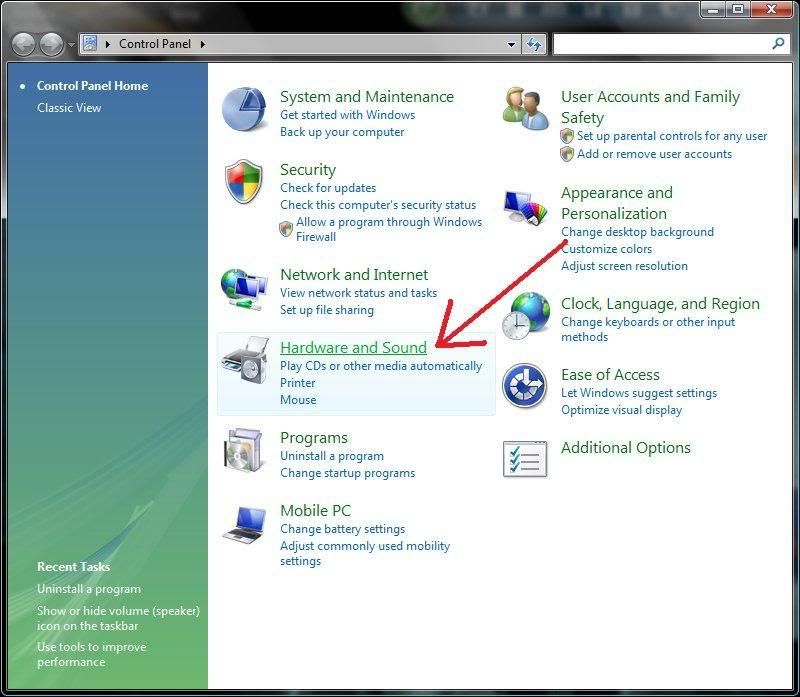
First, you have to enable the Stereo Mix from the Windows Control Panel.
Start > Control Panel > Hardware and Sound

click to enlarge

Click on Sound Control
click to enlarge

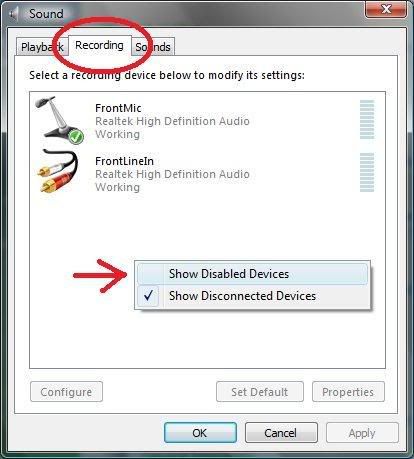
In the Recording tab, right click on the blank space and select [Show Disabled Devices] to call out the Stereo Mix. (Windows XP won't need to do this, as the Stereo Mix is already there)
click to enlarge

OK, now right click on the Stereo Mix and enable it.
click to enlarge


Now, you can record any sound played from your computer with any recording software like Audacity.

Results: GREAT!! Cheers~

More information on Audacity

01 February, 2008

How to recover deleted files?

First, check the recycle bin. See if the thing's still there. If the thing's in recycle bin, thank god, you can recover it for good.

If it isn't, you can have another shot by trying this:


There're some chances that you can get back your old files.
The probability of getting your deleted files back depends on the time you delete the file, the file size, and your harddisc size.

The chances are high when:
- The file was just deleted recently
- The file size is small
- Your harddisc has a large free space

The chances are low when:
- The file was deleted long time ago
- The file size is big(you may not fully recover the whole file)
- You harddisc has minimum free space
- You do disc defragment very regularly(!!!)

I won't explain how to use this software in details. To learn how to use, surf their official website.

Some advise before you download and install the Undelete Plus.
1) Download and save the installer in a saperate drive other than the file you wanna recover. For example, you wanna recover the files on your drive C, download and save the installer into drive D. You can install it into a USB pendrive or external harddisc too.
2) The same goes to installing the software. Install it into a saperate drive. Install it into a USB pendrive or external harddisc if possible.
3) Once you found your files in the list inside the Undelete Plus, undelete and store the undeleted file into saperate drive as well.

Official Website
Download Link: here
Note: Undelete Plus isn't a freeware, it is offering free download now for a limited time. I'm not sure when will this offer ends. So if you wanna get it, get it now before the offer ends.

Read on for some computer knowledge...

How is deleted data recovered?
When you delete a file, the data isn't physically deleted from your harddisc. Instead, it is 'marked' as free space, and will not be listed when you view the folders. The Undelete Plus will scan the whole harddisc and list down all free spaces that contained data in it. When you undelete a file, it isn't 'switched' back from a free space to a file, but it's copied out. That's why the software does not recommend you to undelete the file onto the same drive, as it may overwrite another deleted data. If you wanna know why are some data not recoverable, read on...

How is data stored in your harddisc?
First, let me explain some key concepts of how data is stored. As you may know already, data is commonly measured in bytes. In fact, one byte is equals to 8 bits, where each bit represents a zero or one. So, data are actually made out of 0 and 1s. The harddisc stores data in one rule: data is stored on the first available space.

Let me explain in a more simple way.

Imagine that your harddisc is composed of 100 million small squares, each square represents one kilobytes. Now, if you save a file, let's say, a word document that is 1MB in size, the first 1000 squares will now be 'filled' up. After saving a word document, you saved another image 1MB in size. The disc writer will now write onto the first avaible free space, which is next to the word document you just saved. After that, you went back and edit the word document, made it 700KB, the last 300KB of the data won't be physically erased, but is marked as free space instead. Now you save another media file which is another 1MB in size, the disc writer will find the first available free space(which is the 300KB you just 'freed' out), and write over it. Thus, the media file will split into 2 portions, 300KB will overwrite the 'freed' word document space, and 700KB will be written next of the image file.

While you're saving, editing, deleting and overwriting files in your harddisc, those file fragments are probably scattered all over the harddisc. As time passes, your system may run slow because it have to spend much time on finding thousands of fragments to open a single file. That is why regular defragmentation is able to speed things up a bit by rearranging the file fragments, grouping fragments of same files together to make retrieving data easier and faster.

17 January, 2008

How do RSS works, and how to use it?

For your information, RSS stands for 'Really Simple Syndication'

I'll not explain any deeper. For more details, you can look it up on wikipedia or you Google it.

Let's jump to the main question. How do RSS works?

Before the RSS even born, people used to check updates of a website, or blog, or whatever by visiting the website frequently. This, is very time consuming if you have about 30 friends' blog and 3 forum or news site to check...

Now, with RSS, you can save A LOT of your precious time. After you subscribed with the website you wanna keep track of, you'll be notified when the website is being updated. So all you need is to check out the updated site instead of every single one of 'em.
Watch a simple video explanation of RSS from YouTube

So, the most important thing here is, how to use it?
It's easy. All you need is a RSS reader. It could be your browser, it could be an external software, or a web-based reader, depends on your need.

How to use rss on IE7? (browser)
How to use rss on Firefox? (browser)
How to use rss on Mozilla Thunderbird? (e-mail client)
How to use rss on Google Reader? (web-based reader)

How to use rss on Internet Explorer 7?
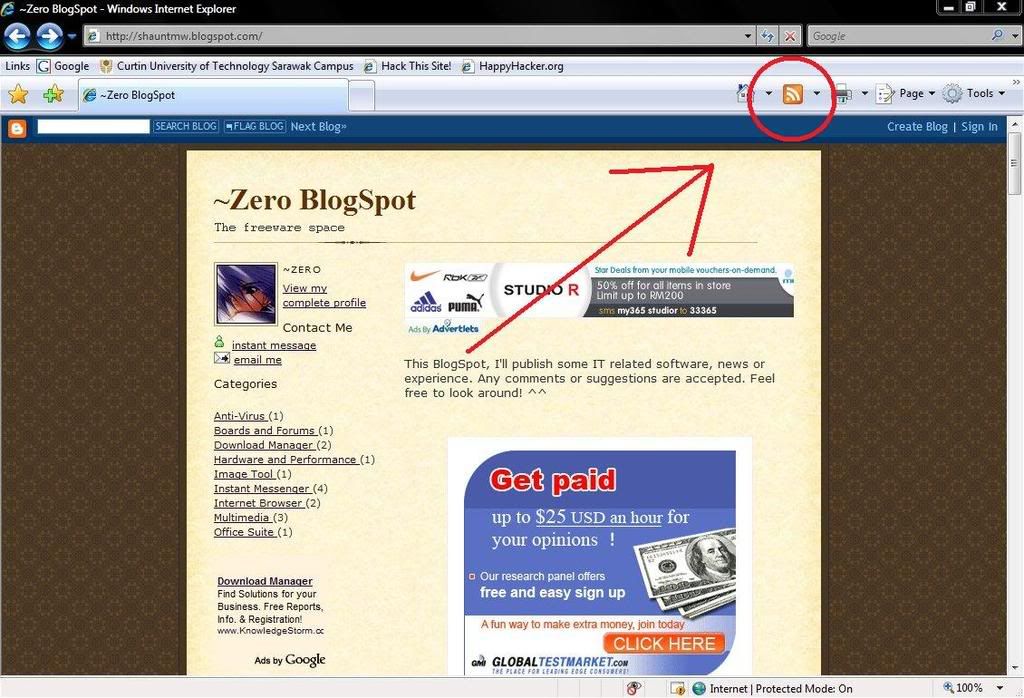
Go to whatever website you wanna subscribe to, and click on the rss icon on your toolbar. (If it's dark and unclickable, that means the website you're looking at isn't supported with rss feed)

click to enlarge


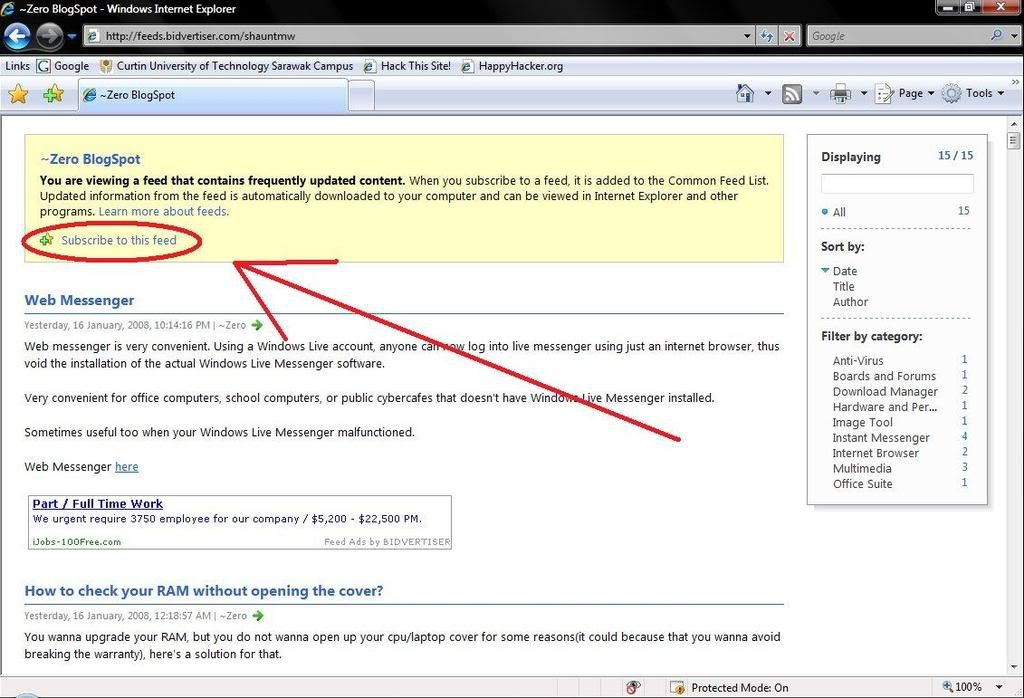
A page like this will most likely appear. Just click on the 'Subscribe to this feed' to subscribe.
click to enlarge


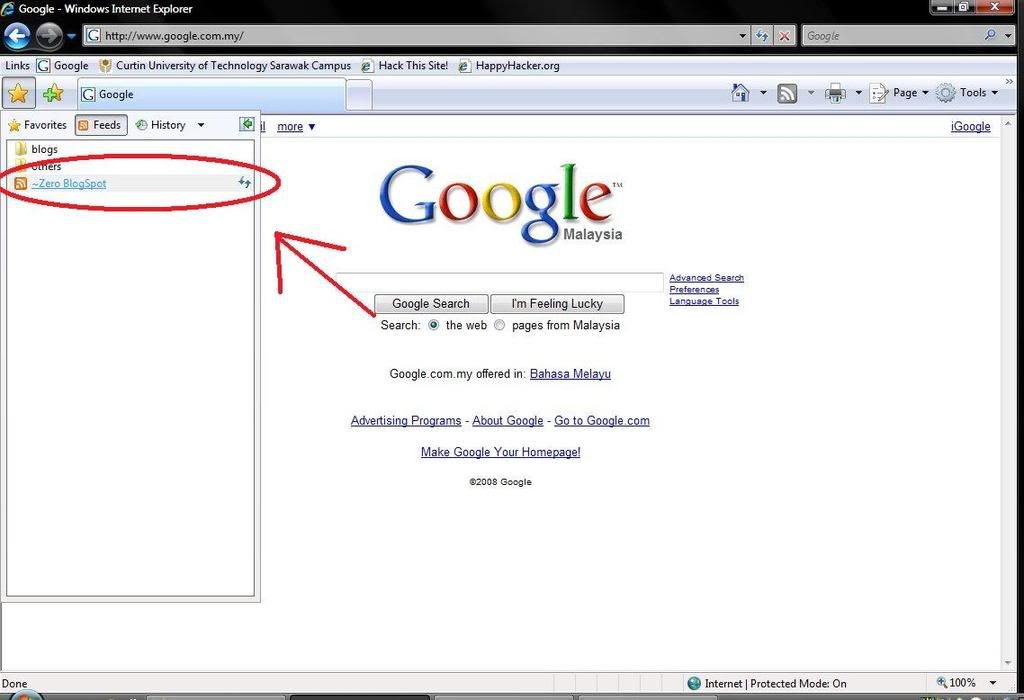
You'll then be promted to save in which location. After saving, you can find the feed under the feed tab.
click to enlarge

Viola~ done! So go on and subscribe to all your friends' blog and new sites as you want!
back to top

How to use rss on Mozilla Firefox 2?
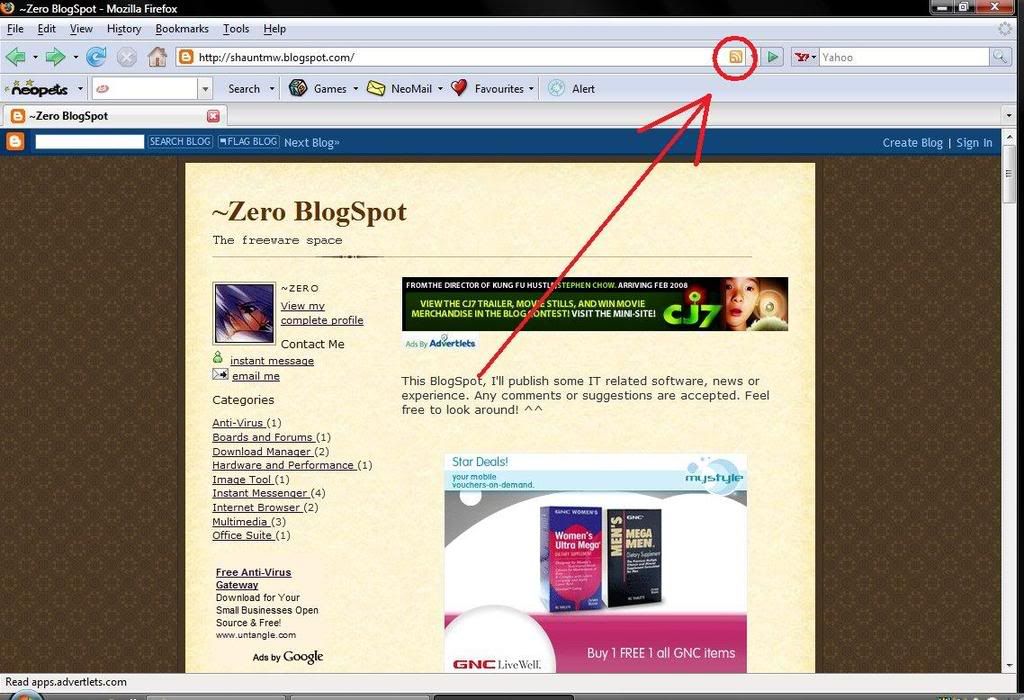
Go to whatever website you wanna subscribe to, and click on the rss icon on the address bar. (If there're nothing, that means the website you're looking at isn't supported with rss feed)
click to enlarge

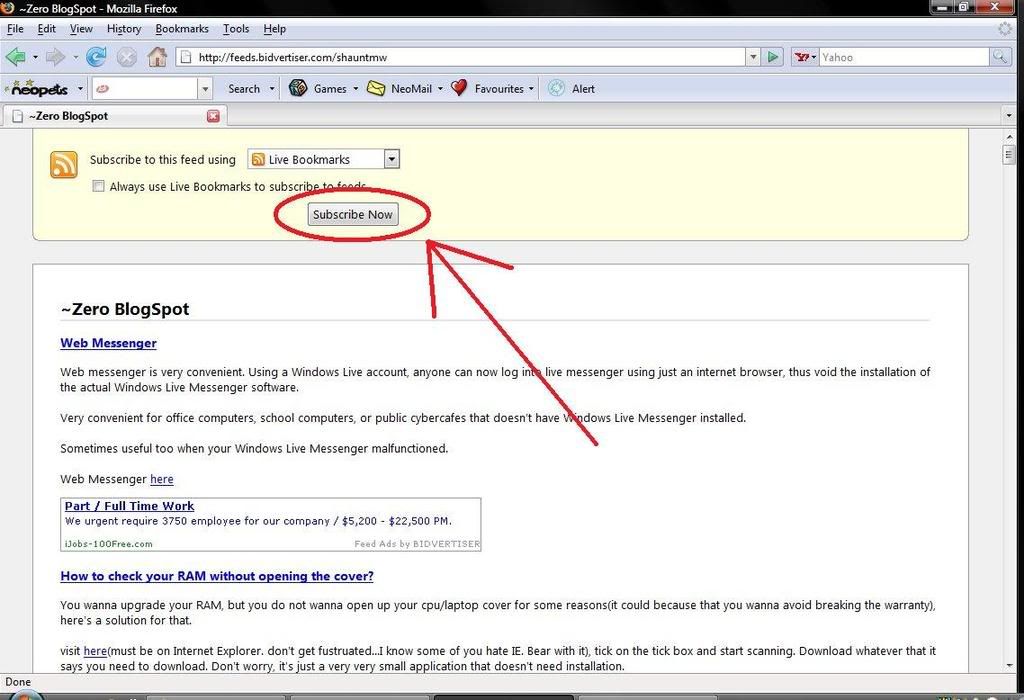
A page like this will most likely appear. Just click on the 'Subscribe now' button to subscribe.
click to enlarge

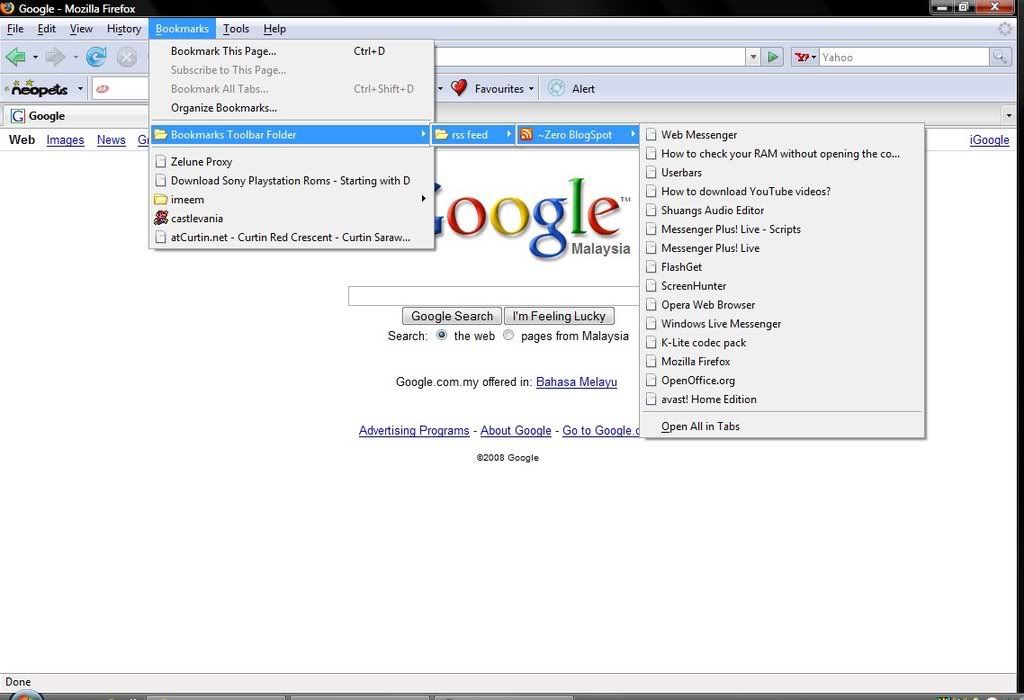
You'll then be promted to save in which location. After saving, you can find the feed under the bookmark menubar.
click to enlarge

Viola~ done! So go on and subscribe to all your friends' blog and new sites as you want!
back to top

How to use rss on Mozilla Thunderbird 2?
Download and install Thunderbird
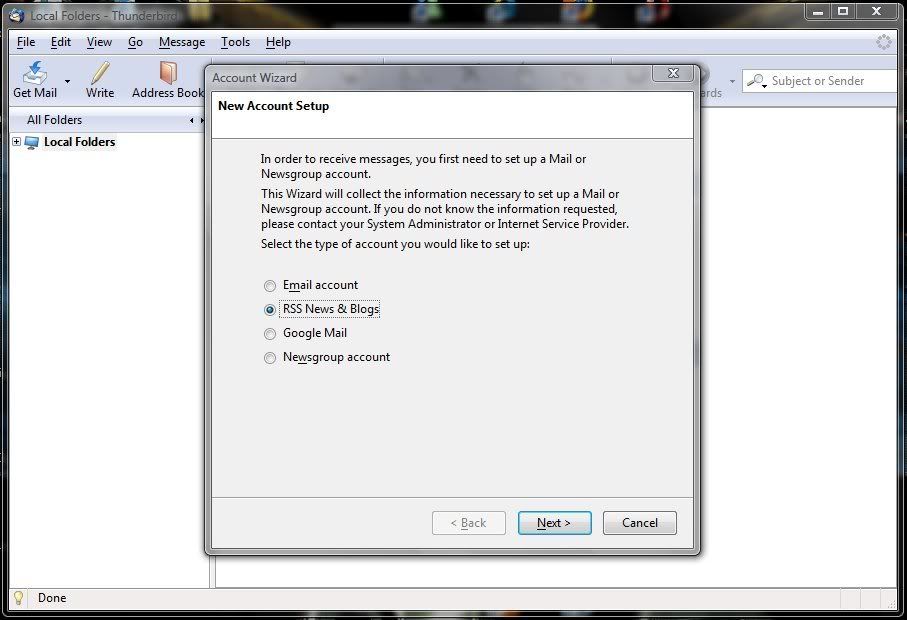
Create an account of 'RSS News & Blogs'. Next, Type in an account name.
click to enlarge

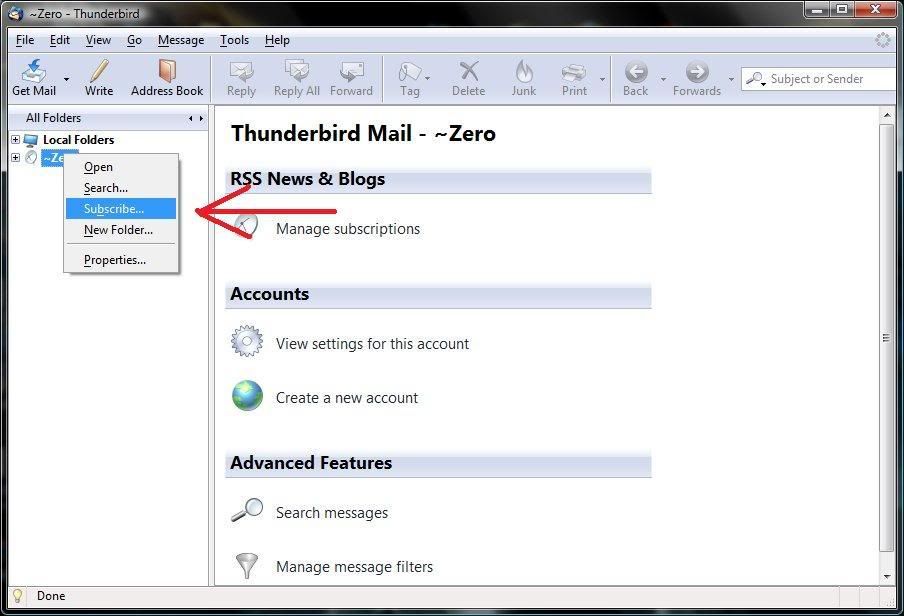
Right click on your account and choose 'subscribe'
click to enlarge

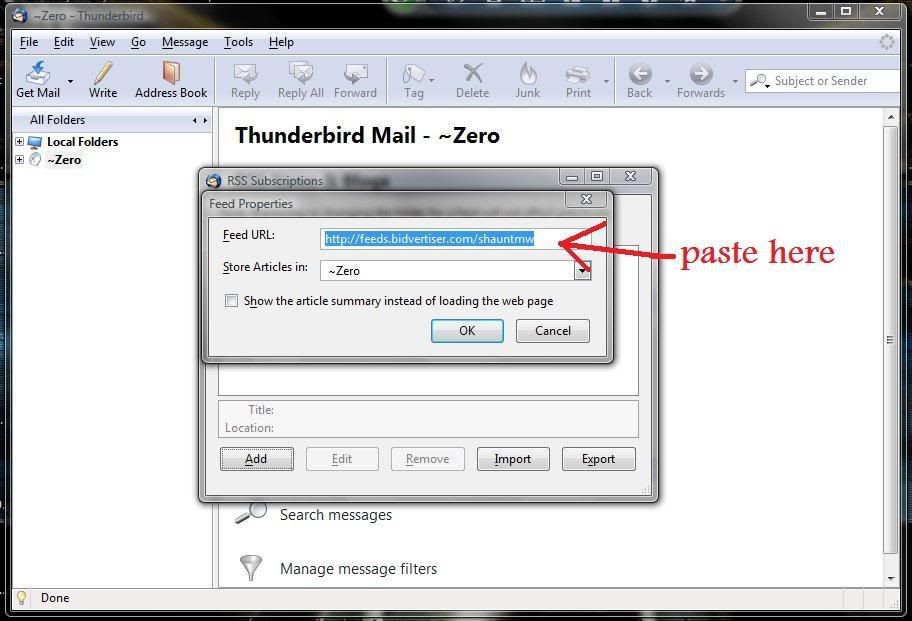
Click the 'add' button, copy and paste the feed url into the box. The feed url can be found by clicking the rss button on websites, usually on the sidebar or the bottom of the site.
Some common rss button:
click to enlarge

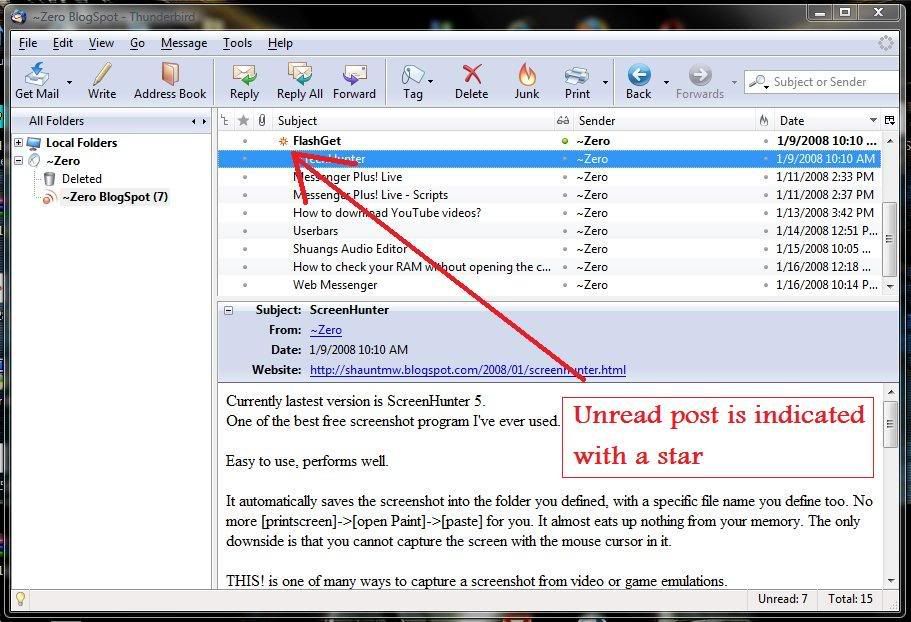
And finally, it will act as a rss reader for you. Unread posts are indicated with a star beside.
click to enlarge

Viola~ done! So go on and subscribe to all your friends' blog and new sites as you want!
back to top

How to use rss on Google Reader?
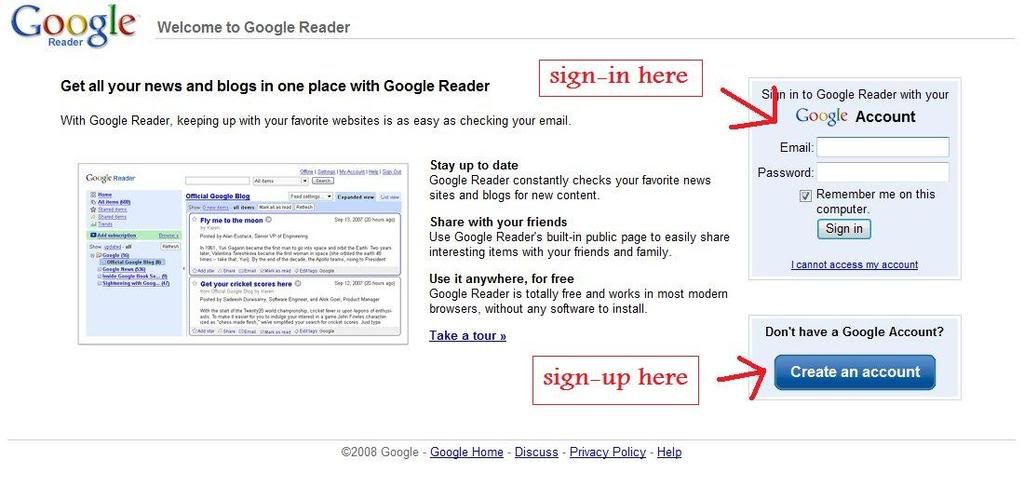
Visit the Google Reader website at http://reader.google.com.
If you have a Google account, sign-in.
If you don't, sign-up one.
clic to enlarge

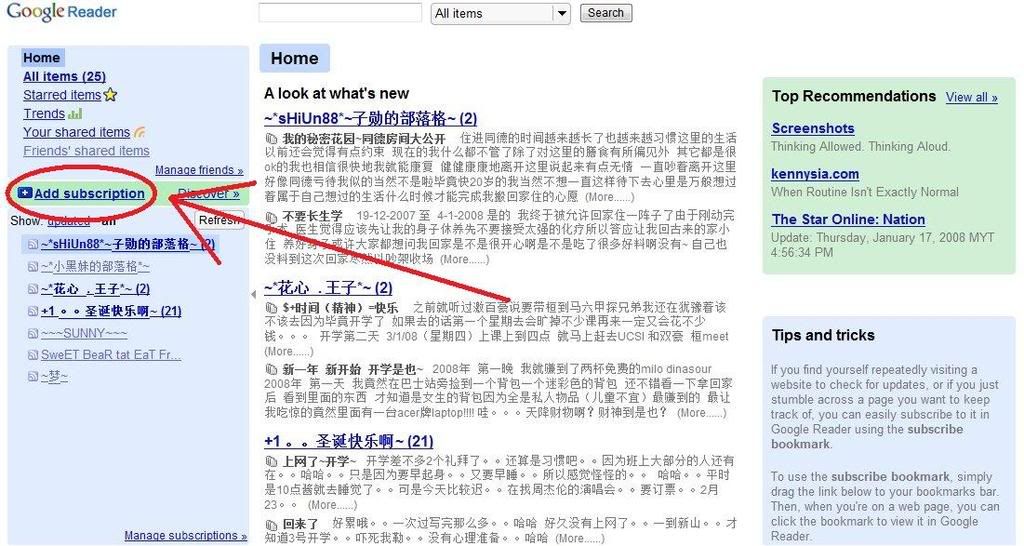
Once you sign-in/sign-up, you'll be redirected into your feed reader. To add a subsciption, click on the 'add subscription'
click to enlarge

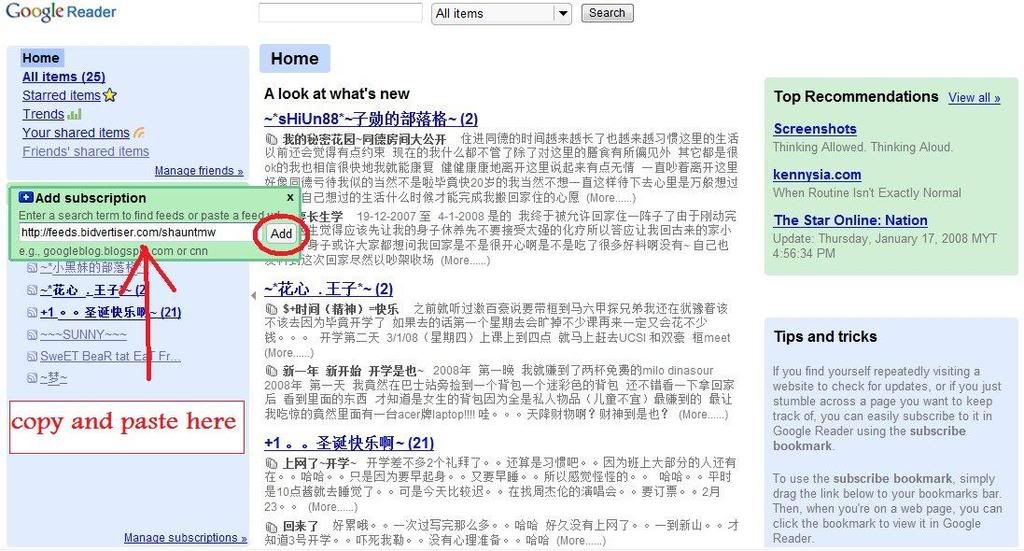
Copy and paste the feed url into the box and click 'add'. The feed url can be found by clicking the rss button on websites, usually on the sidebar or the bottom of the site.
Some common rss button:
click to enlarge

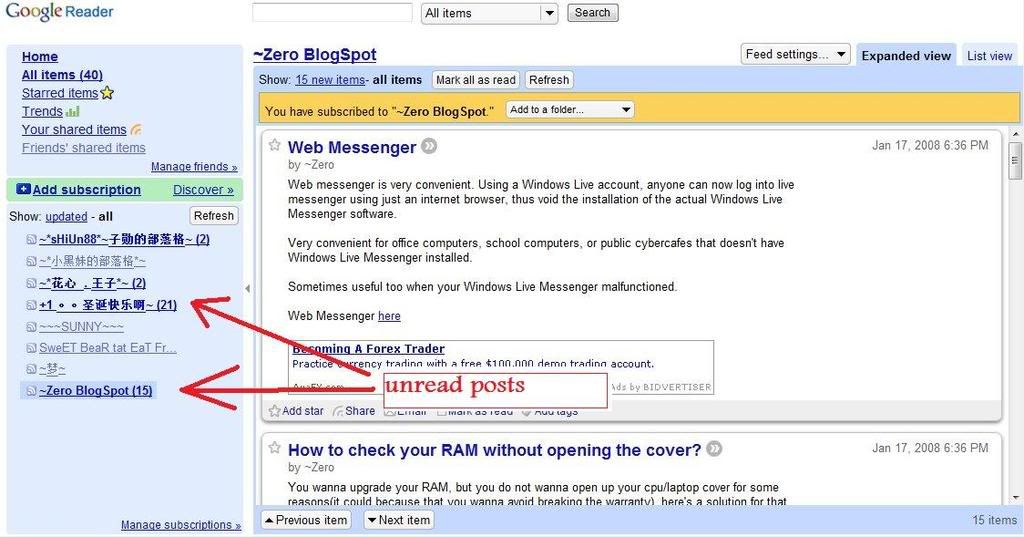
Finally, the unread posts will be bolded.
click to enlarge

Viola~ done! So go on and subscribe to all your friends' blog and new sites as you want!
back to top

External Links:
RSS from wikipedia
A list of RSS readers from wikipedia
Search for RSS using Google

More information on Firefox
15 January, 2008

How to check your RAM without opening the cover?

You wanna upgrade your RAM, but you do not wanna open up your cpu/laptop cover for some reasons(it could because that you wanna avoid breaking the warranty), here's a solution for that.

visit here(must be on Internet Explorer. don't get fustruated...I know some of you hate IE. Bear with it), tick on the tick box and start scanning. Download whatever that it says you need to download. Don't worry, it's just a very very small application that doesn't need installation.
It takes time, so be patient.
If you really can't wait, or it doesn't work for you...
Looks like the only way(and the fastest way) is to open up your CPU yourself...